Cidersage
Hard Cider, Mead, and Miscellany from the Front Range of Colorado
How To Make Mead
Mead-making Tutorial, Part 1: Overview
Overview:
Mead. Honey Wine. Ambrosia. Nectar of the Gods. Whatever it’s called, you want to make it, and that’s why you’re here. Good. Let’s do this.
Before I dig in, I should mention that I use affiliate links in my tutorials. If you purchase the recommended equipment or ingredients after first clicking on these links, I receive a small commission from the vendor, which helps me maintain the site and deliver more content. So thank you in advance.
Styles:
There are many different styles of mead bearing different, often exotic-sounding category names. They generally start as honey, which is then dissolved in water and fermented; some variations include additional fermentable (e.g., fruit) or flavor (e.g., spice) additions. Here are the broad categories, drawn from the BJCP Style Guidelines:
- Traditional Mead (just honey and water, no other flavors or fermentables added)
- Dry
- Semi-Sweet
- Sweet
- Melomel (Fruit Mead)
- Cyser (Apple Melomel)
- Pyment (Grape Melomel)
- Other Fruit Melomel
- Other Mead
- Metheglin (spiced mead)
- Braggot (mead/beer hybrid)
- Open Category Mead (whatever doesn’t fit into the above)
If you really want to get into the weeds on style categorization, the Meadmaker’s Association maintains a much more exhaustive list here.
What’s Different About Fermenting with Honey?
The main features of making mead, as differentiated from brewing beer, are:
- There is no need to boil honey
- Heat can be used to aid dissolving the honey and in sanitizing the honey must, but can drive off the aromatic qualities of the honey
- Some of the best mead makers use no-heat methods with great results
- You’ll likely need to add additional nutrients to the honey must (must=honey dissolved in water), which–unlike beer wort (or cider must)–is essentially devoid of nitrogen
- Adding these nutrients at regular intervals instead of all at once is beneficial to yeast health/growth
- Melomels–honey plus fruit–with fruit added pre-fermentation will likely require fewer nutrient additions, as the fruit brings some nitrogen and other nutrients along for the ride.
- Mead should be agitated multiple times to remove the buildup of CO2 in solution
- Introducing Oxygen is actually helpful during mead fermentation
Mead-making Tutorial, Part 2: Preparation
Get A Reference Text:
The first port of call when getting into mead-making is to obtain a good mead-making book. A tutorial like this one is a great way to get started, but if you’re like me, over time you’ll want to dig into the details and have a good reference text available…a text which eventually becomes dog-eared and stained with various ingredients used in the craft.
The classic text in the mead-making world is The Compleat Mead Maker by Ken Schramm. In it, Schramm details the history of mead, the mead-making process, ingredients used in the various styles of mead-making, and provides reference information in the form of recipes, supplier lists, and guidance on tasting meads.
With this book in hand and with online references such as the style guidelines and forums such as those on gotmead and homebrewtalk, you’ll have enough information to keep you exploring the world of mead for quite some time.
Listen to some Podcasts:
There are some good podcasts out there to kick-start your journey into mead-making literature–even on that long commute home–and which often include newer information than the print copies contain.
- Here is a great session featuring Ken Schramm on The Jamil Show(Jamil Zainasheff being a legend in the home brewing world who features regularly on The Brewing Network and who recently started Heretic Brewing)
- Another great option is this podcast, also featuring Ken, as interviewed by James Spencer of Basic Brewing Radio
- Making Mead With Curt Stock is another option, in which Beer Smith’s Brad Smith interviews Curt Stock–an award-winning mead maker–about mead-making process.
- And finally, Brad Smith’s Making Mead with Michael Fairbrother of Moonlight Meadery, which provides a bit of perspective from an award-winning mead maker who went professional and started his own meadery
Plan Your Batch:
After settling on one of the various mead styles–for simplicity’s sake I recommend a straight honey mead or a melomel that uses a sterile fruit puree for your first batch–source your ingredients and equipment, and start getting things lined up.
Source Your Ingredients:
Guess what? You’re going to need honey. And while honey’s available just about anywhere, quality varies immensely. Not only that, but you’ll be looking for larger containers of honey–and perhaps specific, single-plant varieties of honey–that aren’t so readily available at your local grocery store.
Buying honey in the quantities you’ll need for meadmaking(say, 12 to 18 lb for a 5 gallon batch) gets expensive quickly when you’re buying the small containers readily available for home sweetener use, so spend some time nailing down a source or two for honey. Ideally, find a local beekeeper or honey wholesaler. The National Honey Board’s Honey Locator can be of some assistance in this matter. Keeping tabs on your local farmer’s market and getting familiar with your state university’s agricultural extension is another way to do this. Making mead with local honey is something of a holy grail for mead-makers. Sadly, it’s getting harder and harder to find good, small-scale, local honey–at least in my region–due in part to Bee Die-Off.
Equipment:
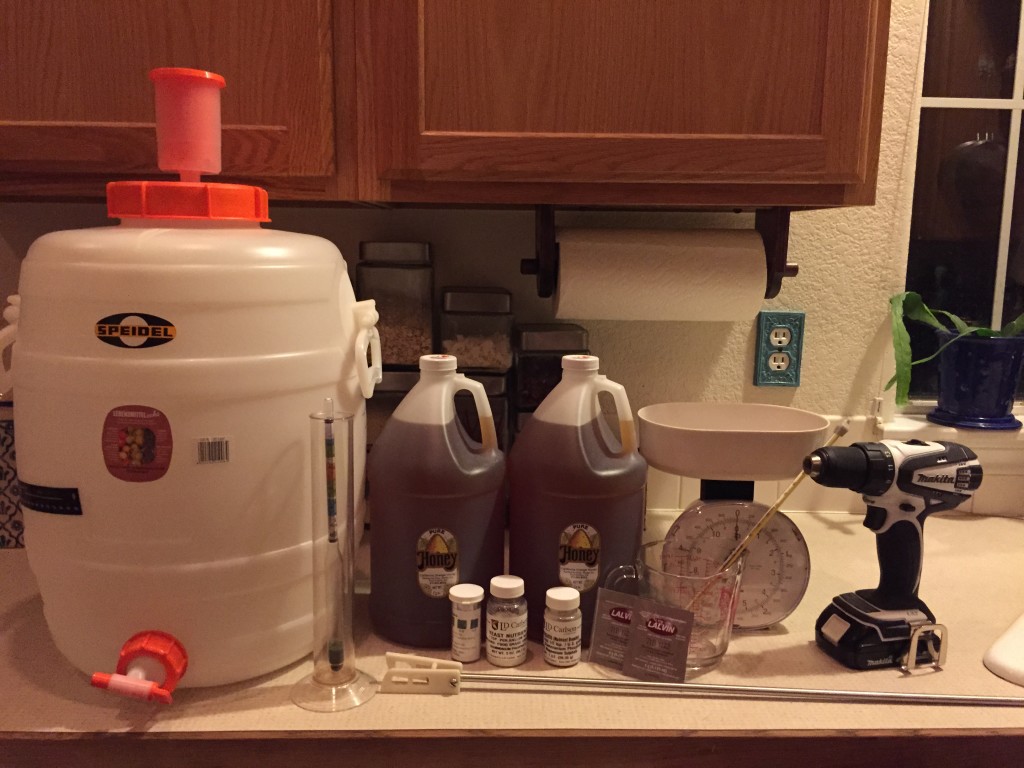
If you’re a home brewer, winemaker, or cidermaker, you likely have most of the needed equipment at hand. If you’re not, the fastest way to get started is with a starter kit from the likes of Northern Brewer or More Beer.
Since I’m a lazy person–at least today–you may notice a striking similarity between this and the list in the cider-making tutorial:
- Fermenters in which to ferment your mead–you may want to consider fermenting buckets for mead, since aerating mead is easier in these formats.
- A Funnel to fill the fermenters with (not necessary for buckets or Speidel plastic fermenters)
- A stopper and airlock for each fermenter
- An auto-siphon (racking cane) and 1/2″ tubing for transferring mead between vessels
- Star San solution for sanitizing all surfaces that come in contact with the must
- Empty spray bottle to make sanitizer solution in (for spraying down surfaces)
- Campden Tablets (potassium metabisulfite) for sulfiting the must (optional)–used for stabilization of a finished mead and/or for initial, pre-fermentation sanitation
- Potassium Sorbate (optional)–for stabilizing meads with residual sugars (to prevent further fermentation)
- A hydrometer and test jar for testing original and final gravity (initial and final sugar content, from which alcohol content is derived)
- Yeast–generally white wine yeasts do well in consuming the honey and letting honey character through in the finished product. Lalvin 71B is a popular choice among both home and professional mead makers.
- Yeast nutrient, for staggered nutrient additions over the first few days of fermentation. Basically, a source of nitrogen for the yeast
- Fermaid K–used alongside Yeast nutrient to aid yeast health and reproduction
- A thermometer for mixing warm water to rehydrate your dry yeast in (if applicable)
- A stirring attachment for an electric drill. This is used to degas the CO2 from your mead must–an essential difference between making beer or cider and making wine or mead
Mead-making Tutorial, Part 3: Make Your Mead!
Example Recipe: Dry Mead
This simple mead should finish bone dry (no residual sugars) due to the amount of honey and a yeast strain, DV10, that can handle a much higher alcohol content than the 12-13% that this one will finish at. Because no residual sugar is involved, Potassium Sorbate is not necessary; however, Potassium Metabisulfite and Potassium Sorbate could be used after the completion of fermentation if back sweetening is desired.
Note: The no-heat method carries some risk as it does not ensure that no potentially harmful bacteria are present in your must. Proper equipment sanitation and using a large amount of healthy yeast up front for initial fermentation mitigates this risk and the resulting mead contains more of the aromatic flavors that you’d lose when sanitizing the must with heat. If you’re concerned about this risk, though, 30 minutes at 160 degrees is enough to kill the vast majority of such organisms.
Ingredients:
- 14 lbs of varietal honey (e.g., clover honey), or a blend of different varieties (e.g., mostly clover honey but with a pound or two of buckwheat honey)
- 1 10g packet of DV10 yeast
- Yeast nutrient (e.g., DAP)
- Fermaid K
Process:
- Sanitize your fermenting equipment
- Make a sanitizer solution using the instructions on the container. For example, a solution of Star San and water
- Sanitize all equipment that will come in contact with the must
- Heat the honey to liquefy it (if needed)
- If the honey is crystallized, either pouring it into hot water to dissolve it or letting the containers sit in a hot water bath for a while will help
- Keep some hot water (boiled, then cooled down to 160 F or so) around in order to extract the last remaining honey from the containers–pour a small amount of the water into the empty jug, swirl, and empty. Use caution as the hot water will create a lot of pressure in a sealed container.
- Add honey and water to the fermenter

- Once the honey can be poured–either straight from the container or dissolved in water–pour it into the fermenter
- Tip: This is easiest with the Speidel plastic fermenters as you can simply place the gallon jug in the top and let it slowly flow.
- Incrementally fill the fermenter to your planned overall liquid level with fresh water (pre-boiled or distilled water from the store if there are any concerns about your local water source), dissolving the honey in as you go. I use a drill and a stirring attachment to speed things up, but a sanitized plastic spoon works fine.
- Once the honey can be poured–either straight from the container or dissolved in water–pour it into the fermenter
- Aerate the must
- Introduce oxygen into the must by rocking the fermenter and getting the fluid to splash about a bit
- Alternately, use a stirring attachment to quickly stir up the must and dissolve any remaining honey not yet in solution
- Tip: This is much easier to do with plastic buckets or Speidel plastic fermenters–the opening is larger and there’s no risk of breakage when the stirring attachment inevitably hits the side of the fermenter.
- Add yeast to the must
- After rehydrating the yeast according to the package instructions (e.g., rehydrate in a small amount of 100 F water for a few minutes), add the yeast to the must
- Make sure the must is not too hot at this point–the yeast will have optimal temperature ranges for their initial addition to the must and also for their ongoing metabolism. Don’t kill the yeast up front with a hot must
- Add the airlock to the fermenter, with sanitary fluid (e.g., sanitizer solution or a high-proof spirit) in the neck
- Add nutrients in staggered increments (quantities below are on the low side…a bit more may be desirable depending on how nutrient-poor the must is)
- Add the first portion of nutrient with the introduction of the yeast (1/2 tsp nutrient and 1/2 tsp Fermaid K)
- Add three more 1/2 tsp increments of nutrient, one at 24 hours, one after 48, and one after 1/3 of the original sugar has been consumed
- Degas the mead periodically

- For the first several days, degas the must with a stirring attachment to drive off the large amount of CO2 that is accumulating in it
- Use extreme caution here–you could easily cause too much CO2 to come out of solution and end up with a geyser of mead coming out of the top of the carboy/fermenter. It is a delicate situation…but driving off the CO2 is helpful to yeast metabolism
- Also, be cautious about adding powdered nutrient around aeration times…it can create nucleation points for CO2 to come out of solution very quickly
- Monitor the fermentation
- Once you’re finished with the staggered nutrient additions and aerations, monitor the activity in the airlock over time. Depending on the fermentation temperature, yeast strain, nitrogen available in the must, etc, this initial fermentation may take from a week to more than a month
- Rack your mead (transfer it to another container)
- When the fermentation activity has died down, use an auto-siphon to transfer the mead to a second, sanitized fermenter
- If you’re not familiar with this process, here’s a YouTube Demonstration by Northern Brewer
- Several rackings into a new, sanitized carboy over a few months may be called for if you have a particularly hazy mead or one with a lot of particulate matter that precipitates out over time
- Age your mead
- Mead generally benefits from aging, though in most cases it should be decent within a few months. If you’ve added oak or some harsh, tannic fruits to your mead along the way, it may take six months or more for the harsher components to break down and for the mead to smooth out.
- Aging at this point just means leaving it in the carboy you racked it to after the completion of initial fermentation
- Keg and/or bottle your mead
- For standard, gravity-fed bottling with capped beer bottles, see this video (priming sugar/bottle carbonation is not necessary, but can be done with mead…it will likely take longer to carbonate, however, given the low-nutrient environment)
- For wine-style bottling (including corking), see this video
- For kegging, see the Kegging Tutorial
- For bottling after kegging, see the Beer Gun Tutorial
Sweetness:
Sweetness in mead tends to be accomplished one of three ways:
- Natural attenuation when the yeast produce so much alcohol that they are unable to keep fermenting–if this happens while sugars are still present in the mead, you’ll have residual sweetness left over
- Know your yeast’s maximal alcohol tolerance (e.g., 14% for Lalvin 71B) and use references like the ABV Calculator and sugar/alcohol tables to determine how much honey to use to achieve a desired residual sweetness
- Stopping fermentation at a time you choose, using chemicals and/or cold temperatures to arrest the yeast’s activity
- Adding sugars (generally honey) to a finished, dry mead to achieve a desired sweetness. This is usually accompanied by chemical intervention with Campden Tablets and Potassium Sorbate that stablize the mead and prevent further fermentation
Using Sorbate:
The way to prevent fermentation from picking back up after back sweetening is to use Potassium Sorbate, which interferes with yeast reproduction. It will not stop an in-progress fermentation as it doesn’t kill live yeast, but if added after fermentation has died down, it will prevent the yeast from reproducing and starting a new fermentation when you add sugar back into solution.
There are pros and cons to using sorbate. Rather than re-invent the wheel, I suggest reading the post on Potassium Sorbate on Winemaker’s Academy, but with these tidbits in mind:
- Sorbate reacts poorly with malolactic bacteria, creating a geranium-like flavor–potassium metabisulfite protects against malolactic bacteria, so metabisulfite and sorbate are often used in combination
- Malolactic fermentation is more of a concern with melomels–especially those made with fresh fruit that could harbor malolactic bacteria–than with straight honey meads (which may have some malolactic bacteria present but little or no malic acid for it to consume)
- There are some potential flavor impacts over time when using Sorbate regardless of the presence of malolactic bacteria–something to consider in a product like mead which can be aged for many years
Furthering Your Mead Sagacity:
Now that you’ve made one batch of mead, you’re an expert, right? No, but if you have the mead bug now, know that there are options for you going forward as you delve ever deeper into the world of mead. Here are a few…
- Get together with like-minded people
- Find a homebrew club (e.g., your local AHA club) and seek out the meadmakers there
- Arrange tastings with friends, and use the BJCP Mead Score Sheet to evaluate your findings
- There are differences in palate and impressions between individuals that are well worth exploring and talking about
- Become a Mead Judge:
- BJCP has a mead judge certification program which one can undertake in a similar fashion to the beer judge certification program.
- Specifics are available here–mead judge exams are pretty hard to find; the most sure-fire bet seems to be at the annual AHA National Homebrewer’s Conference.
- Enter a mead competition
- The Mazer Cup–an annual, all-mead competition judged by luminaries in the mead world
- The AHA National Homebrewing Competition
- Find one locally…
- Open Your Own Meadery:
- Got your attention, didn’t I? Well, I don’t know much about opening a meadery, but perhaps I will someday…if I do, I’ll share some pointers.
- The best place to start would likely be to check out the How To Start Your Own Winery literature, as the legal structure around mead–and cider, for that matter–more closely resembles wine than beer in many cases.
- Along these lines, check out the blog post and podcast, Resources For Becoming A Professional Winemaker
–
Like what you see here? I plan to create a lot more meadmaking, cidermaking, and even orchard management content soon on my new site, ciderschool. There’s not much content there yet, but check it out, get on the mailing list, and stay tuned if you are interested in how-to content, equipment reviews, and resources for making cider and mead.
Copyright © 2024 | MH Corporate basic by MH Themes

Leave a comment